|
How to Cross Stitch
Cross-Stitch
 How to Cross Stitch How to Cross Stitch
How to Stitch
Use the information in this section to help you create the right stitch and select the correct tools to complete your projects.
Working From Charted Designs
Each square on a chart corresponds to a space for a cross stitch on the stitching surface. The symbol in a square shows the floss color to be used for the stitch. The width and height for the design stitch area are given in number of stitches and in inches; centers are shown by arrows at bottom and right-hand side of chart. Locations of backstitches are shown by heavy lines.
Fabrics
In our materials listings, we give fabric suggestions that will complement each design. Our stitched models were worked on a variety of materials including 28-count, 32-count and 40-count linens, which have respectively 28, 32 and 40 threads per inch; 14-count Aida, which has 14 squares per inch; and 14-count perforated paper, which also has 14 squares per inch. |
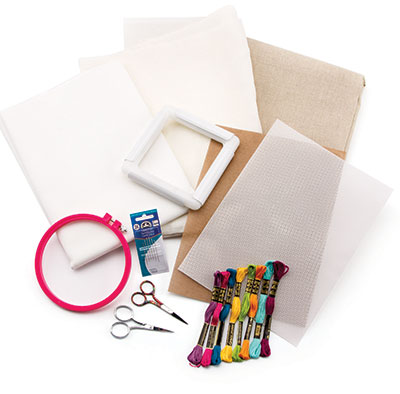 |
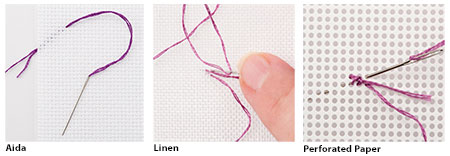
Needles
A blunt-tipped tapestry needle is used for stitching. A size 24 needle is recommended for stitching on 14-count Aida or perforated paper and on 28-count linen; a size 26 needle is recommended for 32-count linen; and a size 28 needle is recommended for 40-count linen. The correct-size needle is easy to thread with the amount of floss required, but is not so large that it will create a larger hole in the fabric or paper. When threading the needle, insert one end of strand or strands of floss and pull through.
Floss
All of our models were stitched using DMC six-strand embroidery floss. Color numbers and names are given for floss. Cut floss into comfortable working lengths; we suggest about 18 inches. When separating the strands, gently pull apart the strands and regroup as indicated by pattern instructions.
Scissors
Good scissors are a necessary stitching tool to have on hand. They are used to cut fabric and floss. We recommend having two pairs of sharp embroidery scissorsone for cutting floss and one for trimming the perforated paper. Always be careful when using sharp scissors or when trimming your designs.
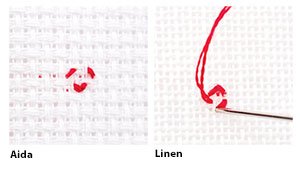
Getting Started
To begin in an unstitched area, bring the threaded needle from the back through to the front of paper or fabric. Hold about 1/4" of the end of the floss against the back and then secure it in place by catching it in the back loops of your first few stitches. To end one length of floss and begin a new one next to existing stitches, weave through the backs of several stitches before bringing needle to the front. Whenever possible, start stitching in the center (indicated by arrows on chart) of a project. |
 |
The Stitches
The number of strands of floss used for stitching will be determined by the thread count of the fabric or paper used and the pattern. Refer to the chart and instructions to determine the number of strands used for cross stitches, backstitches or specialty stitches.
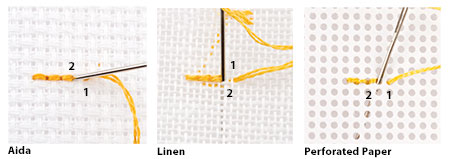
Cross Stitch
A cross stitch is formed in two motions. Following the numbering in the figures below, bring the needle up at 1, down at 2, up at 3 and down at 4 to complete the stitch. Work horizontal rows of stitches wherever possible. |
 |
1/4 Cross Stitch
A 1/4 cross stitch is half of a half cross stitch and should slant inward, depending on the pattern. |
 |
Backstitch
Backstitches are worked after cross stitches have been completed. They may lie in any direction and are occasionally worked over more than one square on a chart. The figures below show the progression of several stitches. Bring the needle up at odd numbers and down at even numbers. |
 |
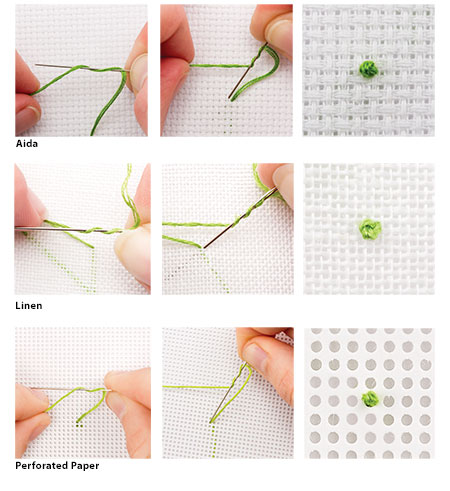
French Knot
Bring the needle up where indicated on chart. Wrap floss once around needle and reinsert in the same place. Hold wrapped floss tightly and pull needle through, letting floss go just as knot is formed. Pull gently and firmly, but do not pull too tightly. |
 |
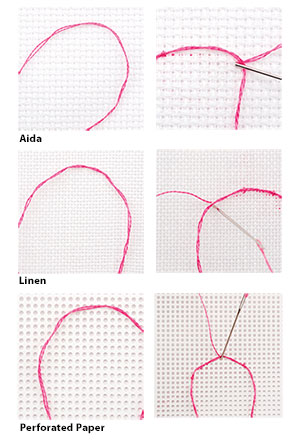
Couching Stitch
Work couching stitches after cross stitches and backstitches have been completed. They are used to create more curves in a pattern and can curve in any direction. The first step is to lay the thread in the desired pattern; the second step is to secure it using small couching or tacking stitches, keeping the shape desired. Refer to instructions for the number of strands indicated for both the laid stitches and the couching stitches. |
 |
Planning a Project
Before you stitch, decide how large to cut fabric. Determine the stitched design size, and then allow enough additional fabric around the design plus 4"6" more on each side for use in finishing and mounting if finishing differently than indicated. Try to allow 4" extra on each side on perforated paper. Cut your fabric exactly true, right along the holes of the fabric. Some raveling may occur as you handle the fabric. To minimize raveling along the raw edges, use an overcast basting stitch, machine zigzag stitch or masking tape, which you can cut away when you are finished. Cut your paper exactly true, right along the holes of the paper.
Finishing Needlework
When you have finished stitching, dampen your embroidery (or if fabric is soiled, wash in lukewarm mild soapsuds and rinse well). Roll in a towel to remove excess moisture. Place facedown on a dry towel or padded surface; press carefully until dry and smooth. Make sure all thread ends are well anchored and clipped closely. Proceed with professional framing, self-framing or finishing, as desired. Note: Dark, saturated colors can run during washing; if this happens, soak in cold water rinses until color lifts from fabric. |
|
|
|
|
