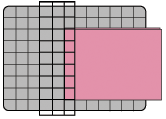
Quick-cutting and piecing strips are recommended for making many projects. Templates are completely eliminated; instead, a rotary cutter, plastic ruler and mat are used to cut fabric pieces.When rotary-cutting strips, straighten raw edges of fabric by folding fabric in fourths across the width as shown in Figure 13.
 |
|
Figure 13
Fold fabric and straighten as shown. |
|
|
|
Figure 14
Wavy strips result if fabric is not straightened before cutting. |
For many strip-pieced blocks, two strips are stitched together as shown in Figure 15.
|
|
|
Figure 15
Join 2 strips as shown. |
The strips are stitched, pressed and cut into segments as shown in Figure 16.
|
|
|
Figure 16
Cut segments from the stitched strip set. |
The cut segments are arranged as shown in Figure 17 and stitched to complete, in this example, one Four-Patch block.
|
|
|
Figure 17
Arrange cut segments to make a Four-Patch block. |
The direction to press seams on strip sets is important for accurate piecing later. The normal rule for pressing is to press seams toward the darker fabric to keep the colors from showing through on lighter colors later. For joining segments from strip sets, this rule doesn't always apply.
It is best if seams on adjacent rows are pressed in opposite directions. When aligning segments to stitch rows together, if pressed properly, seam joints will have a seam going in both directions as shown in Figure 18.
 |
|
Figure 18
Seams go in both directions at seam joints. |
If a square is required for the pattern, it can be subcut from a strip as shown in Figure 19.
 |
|
Figure 19
If cutting squares, cut proper-width strip into same-width segments. Here, a 2" strip is cut into 2" segments to create 2" squares. These squares finish at 1 1/2" when sewn. |
If you need right triangles with the straight grain on the short sides, you can use the same method, but you need to figure out how wide to cut the strip. Measure the finished size of one short side of the triangle. Add 7/8" to this size for seam allowance. Cut fabric strips this width; cut the strips into the same increment to create squares. Cut the squares on the diagonal to produce triangles. For example, if you need a triangle with a 2" finished height, cut the strips 2 7/8" by the width of the fabric.
Cut the strips into 2 7/8" squares. Cut each square on the diagonal to produce the correct size triangle with the grain on the short sides (Figure 20).
 |
|
Figure 20
Cut 2" (finished size) triangles from 2 7/8" squares as shown. |
Triangles sewn together to make squares are called half-square triangles or triangle/ squares. When joined, the triangle/square unit has the straight of grain on all outside edges of the block.
Another method of making triangle/squares is shown in Figure 21.
 |
|
Figure 21
Mark a diagonal line on the square, stitch 1/4" on each side fo the line. Cut on line to reveal stitched triangles/squares. |
If you need triangles with the straight of grain on the diagonal, such as for fill-in triangles on the outside edges of a diagonal-set quilt, the procedure is a bit different.
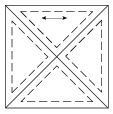
To make these triangles, a square is cut on both diagonals; thus, the straight of grain is on the longest or diagonal side (Figure 22).
 |
|
Figure 22
Add 1 1/4" to the finished size of the longest side of the triangle needed and cut on both diagonals to make a quarter-square triangle. |
If templates are given, use their measure-ments to cut fabric strips to correspond with that measurement. The template may be used on the strip to cut pieces quickly. Strip cutting works best for squares, triangles, rectangles and diamonds. Odd-shaped templates are difficult to cut in multiple layers using a rotary cutter.