|
Raw-Edge Fusible Applique
One of the easiest ways to applique is the raw-edge fusible-web method. Paper-backed fusible web individual pieces are fused to the wrong side of specified fabrics, cut out and then fused together in a motif or individually to a foundation fabric, where they are machine-stitched in place.
Choosing Applique Fabrics
Depending on the applique, you may want to consider using batiks. Batik is a much tighter weave and, because of the manufacturing process, does not fray. If you are thinking about using regular quilting cottons, be sure to stitch your raw-edge appliques with blanket/buttonhole stitches instead of a straight stitch.
Cutting Applique Pieces
1. Fusible applique shapes should be reversed for this technique.
2. Trace the applique shapes onto the paper side of paper-backed fusible web. Leave at least 1/4" between shapes. Cut out shapes leaving a margin around traced lines. Note: If doing several identical appliques, trace reversed shapes onto template material to make reusable templates for tracing shapes onto the fusible web.
3. Follow manufacturer's instructions and fuse shapes to wrong side of fabric as indicated on pattern for color and number to cut.
4. Cut out applique shapes on traced lines. Remove paper backing from shapes.
5. Again following fusible web manufacturer's instructions, arrange and fuse pieces to quilt referring to quilt pattern. Or fuse together shapes on top of an applique ironing mat to make an applique motif that can then be fused to the quilt.
Stitching Applique Edges
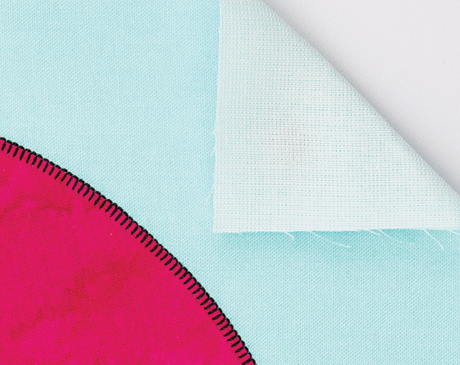
Machine-stitch applique edges to secure the appliqués in place and help finish the raw edges with matching or invisible thread (Photo 1). Note: To show stitching, all samples have been stitched with contrasting thread.
Invisible thread can be used to stitch appliques down when using the blanket or straight stitches. Do not use it for the satin stitch. Definitely practice with invisible thread before using it on your quilt; it can sometimes be difficult to work with.
|
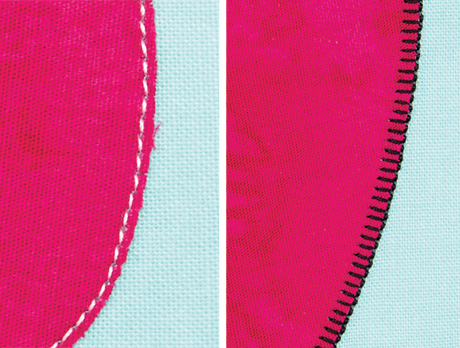 |
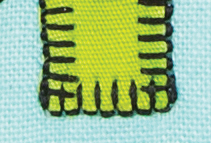
A short, narrow buttonhole or blanket stitch is most commonly used (Photo 2). Your machine manual may also refer to this as an applique stitch. Be sure to stitch next to the applique edge with the stitch catching the applique.
Practice turning inside and outside corners on scrap before stitching applique pieces. Learn how your machine stitches so that you can make the pivot points smooth.
1. To stitch outer corners, stitch to the edge of the corner and stop with needle in the fabric at the corner point. Pivot to the next side of the corner and continue to sew (Photo 2). You will often get a box on an outside corner.
|
 |
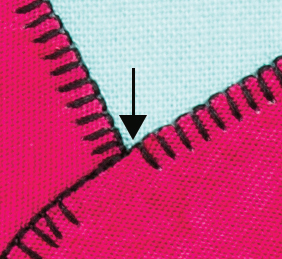
2. To stitch inner corners, pivot at the inner point with needle in fabric (Photo 3). You will frequently see a Y shape in the corner.
|
 |
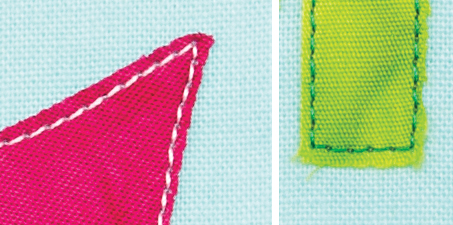
3. You can also use a machine straight stitch. Turn corners in the same manner, stitching to the corners and pivoting with needle in down position (Photo 4).
|
 |
General Applique Tips
1. Use a light- to medium-weight stabilizer behind an applique to keep the fabric from puckering during machine stitching (Photo 5).
|
 |
2. To reduce the stiffness of a finished applique, cut out the center of the fusible web shape, leaving a 1/4"-1/2" inside the pattern line. This gives a border of adhesive to fuse to the background and leaves the center soft and easy to quilt.
3. If an applique fabric is so light colored or thin that the background fabric shows through, fuse a light-weight interfacing to the wrong side of the fabric. You can also fuse a piece of the applique fabric to a matching piece, wrong sides together, and then apply the fusible with a drawn pattern to one side. |
|
|
|
|
